
Focaccia Bread
I love bread. Focaccia bread is one of those bread meat and dear to my heart. I love it’s savory, salty, herby chew. For six months prior to my pregnancy with Daniel I was doing the ever popular keto diet. It was great, I really did love keto. I lost a little weight, kept weight off, and overall would be able to wear my wedding dress again (every woman’s goal am I right?). However, once I found out I was pregnant I wanted to ensure I was receiving proper nutrition and added back some healthy carbs such as cheerios and bananas.
Just to let you know, I earn a modest commission off of purchases made through Amazon affiliate links on this page. Don’t worry, it is of no extra cost to you. I love the products I recommend and hope you do too! For more information, please read my full disclosure policy.
I was super fortunate to never be sick once during my pregnancy, however, that did not absolve me of all nausea and discomfort. I was exhausted, hungry, and experiencing serious food aversions. One of the biggest aversions? Meat. Vegetables (especially broccoli). So, my pregnant keto attempt went out the window. I would be able to return to a modified keto-style diet later in pregnancy (out of necessity), but overall bread was back in my life.
I have always wanted to bake bread. Fresh baked bread is the best smell in the world. The crispy crust and tender inside with all its glorious pockets of airy goodness. I love good fresh bread. I’ve started dabbling in some bread recipes and I have always wanted to try a focaccia bread (which as fate would have it, is just as hard to come by in the South as Irish Soda Bread is). One of our local Italian restaurants makes fresh focaccia and it is delightful. So, when I stumbled upon my go-to baker’s homemade focaccia bread (shout out Brown Eyed Baker), I knew I had to try it.
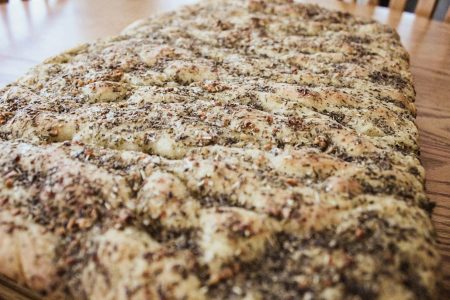
I’ve seen so many recipes for Focaccia Bread but none looked like this. Some of the things I love about Focaccia bread is its chew, the oil, and the salty herby seasoning. This bread is not shy on the seasoning or the oil and I think that is what makes it so dang special. Could you use less oil? Yes, you certainly could. I was really impressed at how the dough absorbed (almost) 2 cups of olive oil and even more enamored by the crunchy, oily, salty crust on the bottom of the bread.
Before you jump in, make sure you know that this bread is a two-day process. The dough hangs out in the fridge overnight before baking so keep that in mind if you’re planning on building a meal around it.

Ingredients
Focaccia Bread Herb Oil:
- 2 cups Olive Oil (I used extra virgin olive oil, we always have it on hand it is my favorite)
- ⅓ cup dried herbs (you can use 1 cup of fresh herbs but who doesn’t have a container of Italian seasoning in their pantry?)
- 1 tbsp kosher salt
- 1 tsp black pepper
- 6 garlic cloves (minced, I like to use the garlic rocker for extra fine garlic)
Focaccia Bread Dough
- 5 cups bread flour (you can sub all purpose flour but it will be lighter with slightly less chew due to the difference in protein, the second time I made it I had to cut my bread flour with all purpose because I didn’t have enough and it turned out just fine)
- 2 tsp salt
- 1 packet instant yeast (or 2 tsp, a packet is 2 ¼ tsp and so I just use the whole thing)
- 6 tbsp olive oil
- 2 cups water (room temperature)
Preparation
- ¼ cup olive oil
Instructions
- Prep your herb oil. Heat the oil over low heat until 100℉. I used a meat thermometer to check this and I let it sit for 5-10 minutes on low it really did not take long. Add your herbs, salt, pepper, and garlic and stir together. Allow the oil to steep and cool while you prep your dough.
- For the dough, combine flour, salt, and yeast in your mixing bowl. I let the paddle attachment mix it together quick because I am lazy. Continuing with the paddle attachment of your stand mixer, add the water and olive oil until the dough comes together to form a sticky mushy dough. Switch to the dough hook and mix the dough for about 5 to 7 minutes on medium speed. The dough will clear the sides but still stick to the bottom of the bowl. Add more flour if necessary to handle but it should be soft and sticky (softer and stickier than pizza dough, for example).
- Flour your hands and turn the dough out onto a floured, clean surface. Sprinkle a liberal amount of flour on the dough and form it into a 6 to 8 inch square and let it rest for 5 minutes.
- Using floured hands, stretch the dough by gently pulling and pushing the sides of your square outward. Fold the dough over itself like a letter to form a rectangle. Drizzle and rub in some olive oil and sprinkle the top with more flour. Gently cover with plastic wrap and let rest for 30 minutes.
- Repeat Step 4. Let rest for 30 minutes.
- Repeat Step 4. Let rest for 60 minutes. The dough will rise but not necessarily double in size.
- Line a baking sheet with parchment paper. I used the biggest of my cookie sheets which is 17.25-in. x 11.5-in. If you use something smaller or bigger the thickness of your bread will vary and you may have to adjust your baking times. Spread the ¼ cup of preparation olive oil on to the parchment using your hands.
- Carefully scoop up your dough rectangle and place it on the parchment. Spoon about half of your herb oil onto your dough as you are using your fingertips, as not to rip the dough, to dimple the dough and spread it across the sheet pan. I had no problem getting the dough to fill the pan but it’s not necessary for it to fill the whole thing in this step. Cover the dough lightly with plastic wrap and refrigerate overnight (or up to 3 days).
- Remove the dough from the fridge 3 hours prior to baking.
- Add the desired amount of herb oil and dimple the dough again to fill the pan. I used probably 1 ½ cups of the herb oil between the first and second dimpling. It looks like it is swimming in oil but it magically absorbs during proofing and baking. You may even be able to strain some herbs and garlic out if you want to tone back the oil and preserve the herbs.
- Cover the pan lightly and allow it to come to room temperature for 3 hours. The dough should rise from about ½ inch to a full inch depending on the size of your pan. The first time I made this I covered it in plastic wrap but the plastic wrap stuck like crazy to the olive oil and made a huge mess. I also found it was slow to rise because of the stickiness of the plastic wrap to the dough. The second time around I took a similarly sized cookie sheet and just turned it over on top to let it rise.
- Preheat oven to 500℉
- Place the sheet in the oven and immediately turn the oven down to 450℉ ad bake for 10 minutes. Rotate the sheet 180 degrees and bake for another 10 minutes or until golden brown. The internal temperature of the bread should read 200℉.
- Remove the focaccia from the pan immediately to a cooling rack. I just slid the parchment on to the rack and pulled it out from underneath the bread. Allow to rest for 20 minutes prior to digging in. I had to set a timer for this because I have no patience but trust me, it is worth it. These cutting boards are perfect for holding and slicing the whole loaf!


About The Author
Amanda
First time mom of one blogging about motherhood, marriage, experience, and what the heck to make for dinner.
Related Posts

Blueberry Cream Cheese Babka
Have you ever seen something while mindlessly scrolling through your Pinterest feed that catches your…
April 24, 2020